My Other Sites: Costume Wardrobe Portal | Costume Wardrobe Blog | The Quilted Hen Blog | Happy Bobbin Blog | Backyardhens Blog
Showing posts with label lolita. Show all posts

Monday, April 6, 2009

Lolita = gathering x infinity

Gathering Progress

Today I completed the dreaded task of rethreading my overlocker (serger) with black thread. This is well overdue as most of my sewing is dark colours, but as it is still relatively new to me (even after 2 years) I didn't want to take the jump and rethread it for the first time. The hardest part was actually working out that I have to cut off all of the threads close to the needles to get them to come out. Then I followed all the little arrows and I must have done it right because it has been going fine.

This also means that it has made my life a lot easier with the velveteen. I have given all of my raw edges seam treatment with the overlocker now which will hopefully reduce the amount of mess spreading from my sewing machine to my kitchen table.

I have also gathered the last layer to the next layer. I have two options now. Gather some more lace to the edge of the next layer, or gather some lace to cover the last seam. I am feeling the urge to procrastinate about the lace again, but at least that is some more progress to show for tonight!

Sunday, April 5, 2009

Steam punk skirt lace

Lots of Lace

I thought it was time to do something on one of my other works in progress, so I tackled the tedious job of attaching metres and metres of lace and finally finished the first layers.

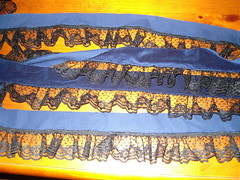
I don't know what my machine is playing at today, but it really doesn't want to help me out. I battled through the next layer of lace though. Today I have finished sewing two layers of lace to the last ruffle and then sewed this to the next layer. Only the lace is gathered at this stage. Next all of this is gathered onto the next section.

There are two types of lace used here. Approximately 10 metres of one and 5 metres of the smaller. The velveteen has a nasty habit of pilling with little navy balls of fluff everywhere! The progress photo wants to go purple, so I have had to adjust the colour as I can't seem to take a good photo tonight.

Sunday, March 15, 2009

Steam Punk Progress

Gathering Lace

I feel like i have been gathering lace for days. I have spent the best part of the day working on this now, beginning at about midday with the measuring and cutting for the velvet. I then stitched the upper part of the skirt, including inserting an invisible zip. This time around I used a friends metal invisible zip foot and it was so much easier. I think because it is a proper foot instead of the plastic kind it held everything firmly in place and so I was able to just sew instead of having to make sure nothing was coming loose.

I have also completed the bottom frill by gathering 10 metres of lace and attaching it to the velvet. This took the most time. I spent well over two hours altogether as pinning the lace onto the 4.5m (approximate) length of velvet was very time consuming. I have a couple of progress photos over on my flickr account.

Saturday, March 14, 2009

Steam Punk Lolita

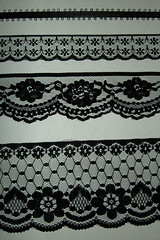
Types of Lace

I am finally making some progress! I have just cut out the frills, which took quite a bit of effort as I had to spread the fabric out on the floor because the table wasn't long enough to cut a 2m24 length. My sudden burst of energy is due to actually having a clean house at the moment which is lending itself to being inspired to do other things instead of feeling depressed about the amount of housework that is piling up.

Earlier in the week I scored some acceptable lace at DK Fabrics which made me feel confident to cut into my lovely blue cotton velveteen. This is the best lace I could find without having to spend over $4/m on Torchon Lace. I needed about 65m of the stuff so I was happy to get it for under $1/m and even happier to realise that one of the designs I purchased might be the same as what was used in the magazine example, so I am sure it will be OK.

The only downside to sewing lolita is the amount of gathering, but the end result is worth it.

Thursday, March 12, 2009

Putumayo Skirt Replica

Skirt Replica

I began this skirt after a burst of inspiration. This is the tartan that I found in a remnant bin for $2 and I also had left over black cotton. I had to get half a metre more of black. After the first weekend I have it almost complete. I still need to make 3 more bows, but I haven't been able to get silver badge backs so that they will be removable. Perhaps I should just sew the bows onto the skirt. I also need to sew on the waist band.

The pattern for the skirt is from Gosu Rori magazine volume 12. The finished skirt will look something like this.

Tuesday, September 16, 2008

Red Skirt

Red Skirt

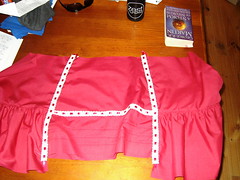
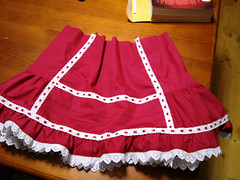
This Lolita skirt was made following the instructions from Gosu Rori volume 7 from the skirt on page 11. The lace is applied to all the seams and the front and back panel has some delicate pin tucks which I think stand out better with my colour choice.

Difficulty: Easy - Medium
Total Time: approx 6 hours

It is hard to explain the actual shapes of the pieces for this skirt. There is a thin band for the bottom with the lace attached, but the rest is made out of pieces. The zip is in the side (though on the pattern the zip is supposed to go in the back - I thought it was wierd having an extra seam in the back when there was a perfectly good seam that could take the invisible zip in the side, so I moved it)

First the front and back pieces are constructed. The pin tucks are sewn in the front, then the two pieces are joined and the seam covered with the lace that has satin ribbon threaded through. Next a wide panel is gathered and the front and back sides are sewn together and attached to the gathered edge. Then the whole lot is attached and the side lace is sewn over the seam as you see in the first picture, which just needs a trim, then the bottom frill and the waist band attached.

Construction Progress

The bottom frill is attached after the lace is sewn. The lace has already been gathered slightly when you buy it so all you have to do is sew it on. Make sure you get a nice cotton on cotton and not one that uses shiny polyester thread on the design. The material is gathered until it lines up with the skirt and then attached with lace applied over the seam again, then the top of the skirt is gathered into the waist band.

Tip: Try to line up any joining seams on the frill or lace with the seams where the pieces join so that all your seams line up and you minimize any seams that may seem out of place.

The most time consuming part of this project is all the gathering, but the end effect is definitely worth it and this is a relatively simple skirt. I have left off the satin bows that the pattern suggests as well as a large material bow for the back as I felt these were unnecessary and liked the simplicity of this design.

Ready for waistband

Unfortunately no pattern for this one at this time. The magazine has detained instructions on how to draft these pieces and I highly recommend picking up a copy if you can. They retail for approximately $25 and contain patterns for approximately 18 whole outfits.

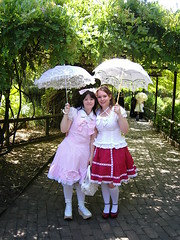
I wore this skirt with an Anna House blouse to a meetup at the Zoo on a 40 degree day, so a parasol was a welcome accessory.

Thursday, December 7, 2006

Petticoats

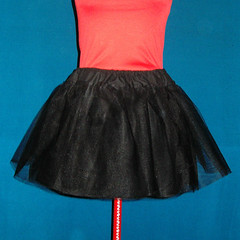
After listening to advice about working with netting I have finally achieved a lovely Lolita petticoat with lots of "poomf"! These petticoats form the integral part of the "bell shape" which is typical in Lolita style clothes.

Difficulty: Easy
Total Time: 4 hours

These petticoats really aren't all that hard. I now know that I simply made some errors in fabric choice and was far to gentle which proved the downfall of my first petticoat.

First get a decent cotton or poly/cotton as the base of the petticoat. You really don't want to work with anything shiny, slippery or light weight because you just won't be able to sew the netting to it.

Second, get yourself some netting. You want the normal netting, not the bridal stuff because the bridal netting is just too thin and doesn't give that nice "poomf" when you put your garments on overtop.

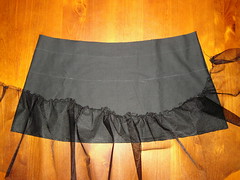
The petticoats from Gosu Rori magazine have a tapered shape as the base of the skirt. Sew the two halves together and then mark out where you will sew the netting to make it easier to pin and control. Hem the bottom of the petticoat now if you need to because the netting will make that hard later on. Put this part aside for a minute.

Cut out your lengths of netting (mine were one length of 2.6m x 33cm and one length of 1.6m x 25cm) and gather one side. Pin one length along the line on your base material and stitch into place. Then pin the next length along the other line and stitch.


Sew your waistband onto the top of the skirt and insert your elastic, and you're done!

You can be quite rough with the netting. You won't hurt it!! Make it conform to where you want to sew... and worse case - remember it is going under your garment and doesn't need to look perfect.

If you find the netting is scratching on your legs you might have made the netting ruffles a little too long. Trim them a centimetre or two all the way around so that the netting is above the cotton base and then the cotton should protect your legs.

Wednesday, December 6, 2006

Bunny Bag

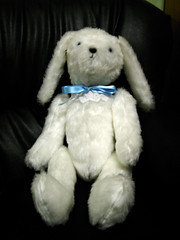
After deciding to do a Lolita version of Alice in Wonderland for the Fairy Tale Picnic event I remembered I had a pattern for a Sweet Lolita bag that was in the shape of a white rabbit. There is no better accessory to hide my wallet and keys!!

Difficulty: Easy
Total Time: 6 hours

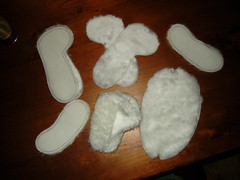
I photocopied the pattern out of Gosu Rori vol 4, but the pattern itself could be adapted to any soft toy where you can put a zip up the back. I only got cheap toy fur because I am probably only going to use the bag once and at the beginning I wasn't sure how it would turn out and didn't really want to spend up to $60 on fur. So my "scrooge" side won out on this one.

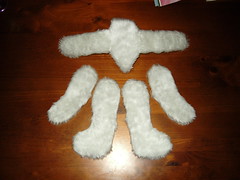
I used about 60cm of fake fur. One tip is to make sure you pay close attention to the way the fur will go. I drew each piece on to the back of the fur, but if you do that make sure you two each of the front and back of the pieces (ie. you need to turn over your paper pieces and do the other side too)


Next carefully cut the fur out. Because the fabric is fur you need to try to cut between the fur follicles. You can see why by having a look at where the shop assistant cut the fur. It is all ratty because the fur was cut through. You need to try not to cut through the fur, just the backing material.

Finally you can start to sew the pieces together. For the head I sewed the ears into the top seams where the gusset joins the sides of the head together. The arms, legs and ears are all relatively straight forward to sew together. After each piece is together turn it the right way and carefully pull the fur out of the seam lines.

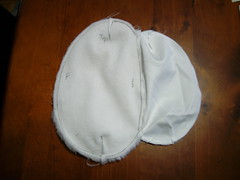
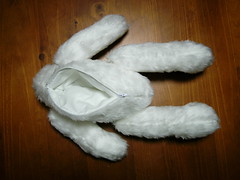
The instructions for the body didn't include a lining for the bag itself and I wondered how the bunny would look if it had my wallet, keys and other things inside without having a little stuffing in there too so that he keeps his shape. I used the original body pattern to draw a smaller shape for my gusset and cut it out of white cotton. First I sewed the zip onto the fur and sewed around the fur leaving a small opening in the front. Next I sewed both pieces of cototn lining to the zip as well so that all the seams would end up in the bunnies tummy. Then I sewed around the lining without leaving a gap. I could turn the stomach in the right way through the gap in the fur seam and then after attaching the arms and legs (described next) I lightly stuffed either side of the stomach lining.


I used some blue toy eyes and some simple plastic arm and leg joints which you can get from the "teddy bear" area in your craft shop. With some of these things you either need to be quite strong to put them together, or use a pair of pliers. You can join each of the arms and legs to the body and then stuff the arms and legs and sew the holes closed.

Finally the head is stitched to the top of the body with a piece of ribbon coming out of the back of the neck seam as a handle. Then I added some lace and a blue ribbon around his neck and stitched on his nose with black cotton embroidery thread.

Tuesday, November 14, 2006

Wa-Lolita Dress

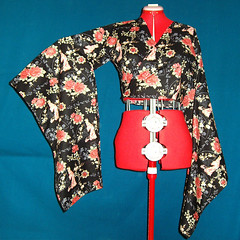
The Picnic at Himeji Gardens in South Australia gave me the perfect excuse to make a wa-loli (Japanese inspired lolita) dress. It was quite simple in design and easier to fit, but the material was expensive.


Difficulty: Easy
Total Time: 35 hours

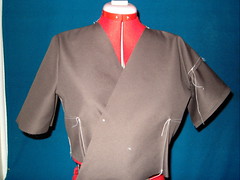
The dress was a design from Gosu Rori vol 7. I constructed a mock up of the top of the dress to ensure the sizing was correct and deliberated for a while over the sleeves. I wasn't sure if the sleeve design would work because when I tried it I found that there was quite a noticeable crease near the arm pit on my mock up.


I constructed a second set in sleeve and tried this, however I then felt that the sleeve was too fitted and was not in keeping with the Kimono-style of a wa-loli dress. You can see from the photo the two types of sleeves I tried and here are the patterns for each.

I constructed a second mock up using a lighter material which more closely matched the printed cotton material I had chosen for the dress and found that actually the creasing around the arms wasn't as noticeable as I'd thought it would be, therefore I decided to plow ahead.

The dress itself was very easy to construct. My only downfall was the printed material. I wanted to try to keep the geisha design upright, so I had cut my material carefully and sewn each piece together after carefully lining up the sections. I started taking some progress shots after sewing the sleeves together and then noticed a big issue through my view finder. Because of the way the sleeves were put together one side of each sleeve was up the wrong way. I had to unpick both sleeves completely and cut them in half so that I could have the pattern the right way up on both sides.


The bottom of the dress was never going to be up the right way, so I just sewed it as best as I could. The collar was partially hand sewn, which was the most time consuming part, but for the majority of the hemming I used the machine.

The corset was a simple pattern which I had already used once for the corset of my Urchin cancan dress . I altered it a little to see if it would work better if I had a squarer design. I am not 100% happy with it, but it did the job. One point was that I should have been more careful with the poly boning because I didn't trim it accurately this time and it starts to poke out through the material.

The material of the corset itself was cut to allow the majority of the pattern to show. It had an intermittent pattern which I wanted to utilize in the body of the corset. I also had to be careful that I used the right sides together because one side up was blacker than the other side when it caught the light.

I purchased my geta from an ebay seller in the US. They arrived really quickly, and although simple they did the job. Unfortunately my puppy decided they were a good chew toy at one stage and took a chunk out of one of the sides, but thankfully no-one noticed on the day.

Friday, August 25, 2006

Vinyl Dress

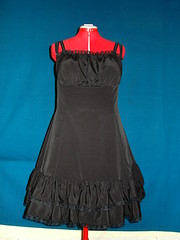
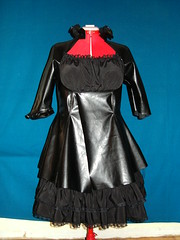
My first lolita dress is from Gosu Rori magazine Vol 6. The hardest part of this costume was the invisible zip and working with the slippery vinyl.

Difficulty: Medium
Total Time: 51 hours

The dress itself consisted of a petticoat skirt, under dress, overdress and a hairpin. Gosu Rori magazines have pattern sheets in the back with pages of instructions (in Japanese of course) which I needed to decipher.



Underdress

With this part of the outfit I felt like I really started utilising my dress-dummy for the first time. Because my breasts are quite a lot larger than a typical Japanese girl I had several issues with this pattern. Initially I knew that the body of the pattern would fit because it was directly adapted from the overdress pattern which I had done a mockup for. So I sewed the main parts together and pinned it in approximately the right spot on my manaquin. The straps were a real trial. I had at one stage about 6 paper variations and got so sick of cutting little pieces of paper that I ended up just making on to see how it went and luckily it seemed to work.

The invisible zip was another episode entirely and I think I will write a seperate article about that. I learnt from a friend that you need to buy an invisible zip foot from your local sewing shop (ie Spotlight). I fitted the foot to my machine and spent a while looking at how it was it would work. Then I tested it on a spare zip I had bought and it was a DISASTER! The foot kept slipping sideways and I would end up sewing over the zip and at one point I got so angry that I just had to stop and nearly gave up entirely.

After wishing I had 6 arms I managed to hold the zip (which I basted first - yes basting is sometimes very handy so don't be slack!), the foot, the material, put the foot down and work the machine (phew) and somehow slowly and miraculously I got the zip sewn in.

The front was interesting again and I completed the ruffles on the bottom well before I had solved the problem of how I would cover my boobs. I had already followed the pattern which just did not work although it looked great on my dummy at which point my friend gave me another idea. Put your bra on your dummy! So thats right, my dress-dummy now wears a stuffed bra and I am thinking of making something a little more permanent.

I ended up with a piece about three times bigger than the pattern which is gathered along the bottom and has lace and elastic along the top. That was sewn in carefully and thankfully not only covered my modesty, but also looked great!
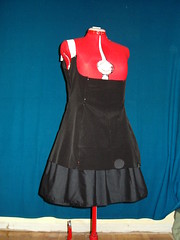

Overdress

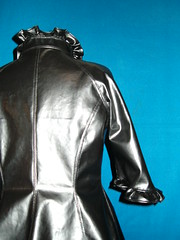
Firstly a warning for everyone: Vinyl does not take kindly to pins or unpicking because you will end up with small holes in your fabric. I had to draw each piece of the pattern with tailors chalk because I could not pin my pieces to the material. I did pin around the outside of the pattern though so that the material would not slip and I utilised pins carefully when doing the ruffles in areas inside the seams.

Secondly vinyl is slippery. While sewing the pieces wasn't too hard because there is a material-like backing, I wanted to sew the seams so that there were two lines of stitching parallel to the seam. I had to reduce the tension of the feeders so that they would not leave marks on the front of my garment and carefully help the fabric through the machine by pulling from the back as I slowly stitched. The effect though was very very nice.

The ruffles were quite fiddley to complete and time consuming to gather evenly and then pin and slowly sew. Each seam has stitching next to the seam and this is the reason why the ruffles sit so nicely because the seams are actually pressed  flat and open when the secondary stitching is complete.

The zip in this case was quite easy and I chose a nickel coated open ended jacket zip. Also the fold lines that I originally had from my material being stored for a month fell out over the period of sewing. Do NOT iron your vinyl, but you can apparently heat it softly with a hair dryer and any creases you do get will fall out. I did not try this as the weight of the garment hanging on my dress-dummy meant the creases disappeared during construction.

Unfortunately I don't have many progress shots of this part of the costume because I ended up doing most of the construction over two long nights and I completely forgot! The only thing this progress shot is missing is the bottom ruffle and a couple of hook and eye clips on the collar.

Hair Pin

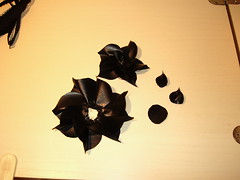
The pattern for the hairpin consisted of about two dozen little hearts - 8 large, 5 medium and 7 small - and a circle for the back. Each heart is folded and then sewn along the bottom. Then each heart is sewn in a circle. I found it easier to sew each heart together one by one rather than trying to pin and sew all of them at once.

The layers are built up. You can see from the image that i have two hearts that I have not sewn in yet (they went in the middle of the 5 hears small circle sewn in by hand) and in the image I have already hand sewn the small set of hearts to the medium set. Next I sewed the two small hearts into the middle and then sewed the large hearts together. The circle covers the seams and then the bobby pin is sewn to that.

This is quite a large flower, but it is extremely effective and I got several positive comments though I don't know if many people realised that I had made this part of my costume as well.