

Difficulty: Easy
Total Time: 35 hours
The dress was a design from Gosu Rori vol 7. I constructed a mock up of the top of the dress to ensure the sizing was correct and deliberated for a while over the sleeves. I wasn't sure if the sleeve design would work because when I tried it I found that there was quite a noticeable crease near the arm pit on my mock up.
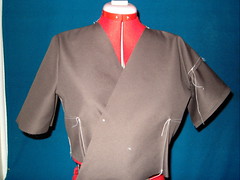
I constructed a second set in sleeve and tried this, however I then felt that the sleeve was too fitted and was not in keeping with the Kimono-style of a wa-loli dress. You can see from the photo the two types of sleeves I tried and here are the patterns for each.
I constructed a second mock up using a lighter material which more closely matched the printed cotton material I had chosen for the dress and found that actually the creasing around the arms wasn't as noticeable as I'd thought it would be, therefore I decided to plow ahead.
The dress itself was very easy to construct. My only downfall was the printed material. I wanted to try to keep the geisha design upright, so I had cut my material carefully and sewn each piece together after carefully lining up the sections. I started taking some progress shots after sewing the sleeves together and then noticed a big issue through my view finder. Because of the way the sleeves were put together one side of each sleeve was up the wrong way. I had to unpick both sleeves completely and cut them in half so that I could have the pattern the right way up on both sides.
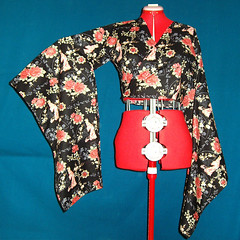
The bottom of the dress was never going to be up the right way, so I just sewed it as best as I could. The collar was partially hand sewn, which was the most time consuming part, but for the majority of the hemming I used the machine.
The corset was a simple pattern which I had already used once for the corset of my Urchin cancan dress . I altered it a little to see if it would work better if I had a squarer design. I am not 100% happy with it, but it did the job. One point was that I should have been more careful with the poly boning because I didn't trim it accurately this time and it starts to poke out through the material.
The material of the corset itself was cut to allow the majority of the pattern to show. It had an intermittent pattern which I wanted to utilize in the body of the corset. I also had to be careful that I used the right sides together because one side up was blacker than the other side when it caught the light.
I purchased my geta from an ebay seller in the US. They arrived really quickly, and although simple they did the job. Unfortunately my puppy decided they were a good chew toy at one stage and took a chunk out of one of the sides, but thankfully no-one noticed on the day.