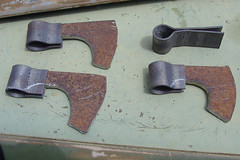
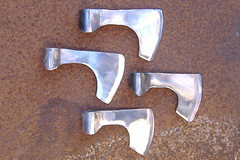
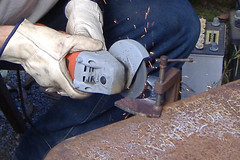
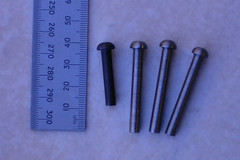
This was a relatively quick project - four axe heads in a day! We whipped these up pretty quickly and they look great. They were made using only a grinder, a welder and a bench vise. This breakdown is for all four of the axes without their handles.
Difficulty: Easy
Total Time: 10 hours
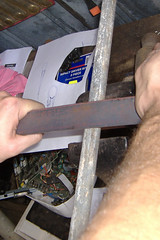
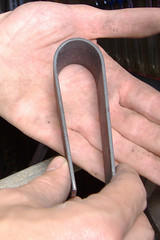
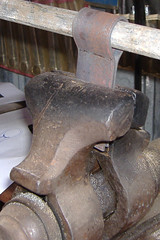
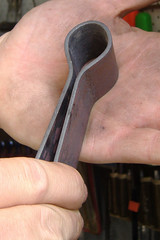
We started my cutting a metal strip into lengths and bending them into the shape for the back of the axe head. This was done using nothing but brute strength and a bench vise with a metal bar about the same diameter as the destined handle. You can see the progess in the photo above.
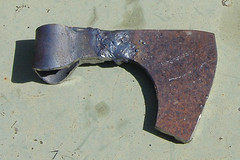
The rest of the axe head was cut out of metal to the basic shape we required. They were cut with an angle grinder and each one is slightly different. The back and blade were positioned together ready for welding after the back was cut down to remove the excess from the bending process. You can see from the photo how the welding is built up in the centre in order to properly bond the two pieces together.
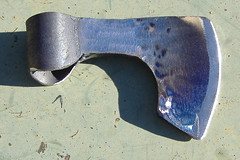
After welding the angle grinder was used to remove any excess and the axe head really started taking shape. Although the axes are built to the combat standards of the NVG it is still aesthetically pleasing to be able to see where the blade is and this was ground into the axe head. Other imperfections were ground out as well leaving a shined finish. If weld lines began to show through these were re-welded and ground again to ensure durability.
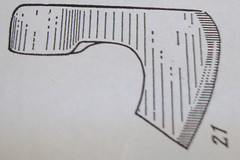
Above, the left photo shows the process around halfway through just after welding was finished. The other photo shows our source image which is from a book called Russian Archaeological Finds (one of a set of three that are full of line art images), which gave us a guide for the shape and size of these axe heads.
Friday, December 16, 2005
Thursday, November 3, 2005
Lucet
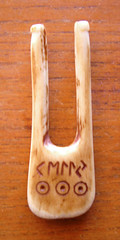
This bone lucet was a gift last year. The shape and designs were carved from the bone and then stained it with tea to bring out the designs, which is my name carved in runes and three concentric circles which are a common Viking pattern.
Difficulty: Medium
Total Time: 3 hours
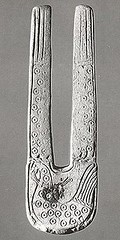
The original find that he based my lucet on is the "chicken" lucet, which was made out of whale bone and has an image of a bird on it with the same concentric circle designs. I also received a brass pick, which was hand forged over the kitchen hot plate for me to use to pick the threads up. We don't have an extant find for the pick, but it does make life much easier when making cords with it.
When I am making cord with it the base sits nicely in the palm of my hand and the indents you can see at the top of each prong keep the threads (wool) held on better and make it quite easy to use.
Wednesday, October 12, 2005
Viking Lock
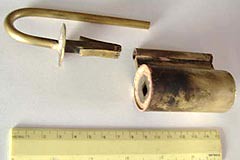
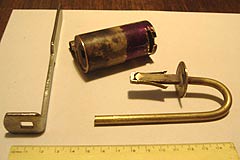
To compliment my Viking chest I asked my father for a period lock. He has spent quite a while researching something authentic, yet practical, and with some finishing touches still to go has said he has spent about 40 hours on it so far. Thanks Dad!
Difficulty: Hard
Total Time: 40+ hours
The lock barrel and mechanism were constructed using brass and silver solder. The key is steel which seems to fit in with what is commonly found in archaeological finds.
The key is designed to slide over the mechanism on the inside, pressing the tongues together and releasing them from the inside of the barrel which opens the lock.
These photos show the lock nearly complete next to a 15cm (6") ruler.
Sunday, October 9, 2005
Hedeby Apron Dress
For an upcoming show I decided to make a new over dress. This is a tube style based on a find from Hedeby/Haithabu harbour aiming at the 10th century and is made of wool, though linen may have been more common.
Difficulty: Easy
Total Time: 6 hours
The Viking apron dress is a widely debated garment. Many artistic impressions show an apron dress to be made of two rectangular strips of fabric hanging from the oval brooches and sometimes tied at the sides with ribbons much like a tabbard. This reconstruction is highly unlikely, and as yet I have not found any extant research suggesting this method of reconstruction.
There appear to be three styles of apron dress available during the periods that I have been researching (9th-12th centuries). Here they are in a little more detail:
The Peplos
The Finnish Peplos is one of the only complete finds that we are lucky enough to have. This image is from the book "Ancient Finnish Costumes" which seems to be out of print and unfortunately I do not own a copy myself.
It is held up with the brooches and is closely related to the earlier Roman styles. A apron held on with a belt also helps to keep the sides closed as these do not seem to be stitched at all.
This is the only garment I could find that resembles the two panel reconstruction that is most commonly seen in artistic impressions, however it is still quite fitted and practicle due to the manner in which it is worn.
Related Link: Suomalainen muinaispuku (in Finnish)
The Wrap
The wrap apron dress is becomes practicle due to the manner in which it is worn. This style is not open at the sides at all and is made of either one peice which overlaps at the front, or two pieces which overlap at both front and back.
For me personally the singular piece wrap seems most practicle as I imagine that it would be much easier to get on by oneself. Also I imagine that the two peice would need some kind of brooch or fastener on the back straps to hold it together.
This image shows the front panel pulled open so that it is easier to see what is meant by a wrap apron dress.
Related Link: Early Period
The Tube
The Tube dress is the one that I have reconstruced here. This is a simple design and for me seems the most practicle as it is completely enclosed on the sides for warmth and practability when working.
This is still conjecture however, as only fragments have been found of Viking clothing, but it is now believed that this was one of the most common styles of apron dress and this reconstruction is aiming at the 10th century.
This is probably still a development of the peplos.
Related Link: Historiska Varldar
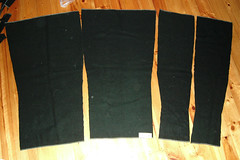
Four panels make up my Viking style apron dress. Here they are laid out on the floor prior to sewing. You can see that it is slightly fitted at the waist and I am considering a little more reduction there to better accentuate natural curves.
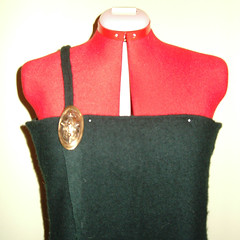
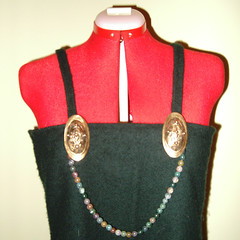
The straps that are such an integral part of a "hanging dress" (hangerock) are made of the same green wool and were hand sewn with blanket stitch. I was nearly out of material and just managed to get the two strips out of the small left over pieces.
Here I have shown the first strap nearly complete and both straps complete with the brooches and agate beads that I plan to wear with it. I also have a pair of embroidery shears and a key which will be attached as well. And for all those that want their costimes NOW... its taken me two years to make a dress after my first rough and quick finnish apron dress. I am very happy with how it is turning out though.
Difficulty: Easy
Total Time: 6 hours
The Viking apron dress is a widely debated garment. Many artistic impressions show an apron dress to be made of two rectangular strips of fabric hanging from the oval brooches and sometimes tied at the sides with ribbons much like a tabbard. This reconstruction is highly unlikely, and as yet I have not found any extant research suggesting this method of reconstruction.
There appear to be three styles of apron dress available during the periods that I have been researching (9th-12th centuries). Here they are in a little more detail:
The Peplos
The Finnish Peplos is one of the only complete finds that we are lucky enough to have. This image is from the book "Ancient Finnish Costumes" which seems to be out of print and unfortunately I do not own a copy myself.
It is held up with the brooches and is closely related to the earlier Roman styles. A apron held on with a belt also helps to keep the sides closed as these do not seem to be stitched at all.
This is the only garment I could find that resembles the two panel reconstruction that is most commonly seen in artistic impressions, however it is still quite fitted and practicle due to the manner in which it is worn.
Related Link: Suomalainen muinaispuku (in Finnish)
The Wrap
The wrap apron dress is becomes practicle due to the manner in which it is worn. This style is not open at the sides at all and is made of either one peice which overlaps at the front, or two pieces which overlap at both front and back.
For me personally the singular piece wrap seems most practicle as I imagine that it would be much easier to get on by oneself. Also I imagine that the two peice would need some kind of brooch or fastener on the back straps to hold it together.
This image shows the front panel pulled open so that it is easier to see what is meant by a wrap apron dress.
Related Link: Early Period
The Tube
The Tube dress is the one that I have reconstruced here. This is a simple design and for me seems the most practicle as it is completely enclosed on the sides for warmth and practability when working.
This is still conjecture however, as only fragments have been found of Viking clothing, but it is now believed that this was one of the most common styles of apron dress and this reconstruction is aiming at the 10th century.
This is probably still a development of the peplos.
Related Link: Historiska Varldar
Four panels make up my Viking style apron dress. Here they are laid out on the floor prior to sewing. You can see that it is slightly fitted at the waist and I am considering a little more reduction there to better accentuate natural curves.

The straps that are such an integral part of a "hanging dress" (hangerock) are made of the same green wool and were hand sewn with blanket stitch. I was nearly out of material and just managed to get the two strips out of the small left over pieces.
Here I have shown the first strap nearly complete and both straps complete with the brooches and agate beads that I plan to wear with it. I also have a pair of embroidery shears and a key which will be attached as well. And for all those that want their costimes NOW... its taken me two years to make a dress after my first rough and quick finnish apron dress. I am very happy with how it is turning out though.
Saturday, October 1, 2005
Dying Silk Noil
I found with one project that obtaining the desired colour of Silk Noil (raw silk) just wasn't going to happen. I was lucky enough to come across a bolt end of creamy white silk and decided to try dying material for the first time.
Difficulty: Easy
Total Time: 3 hours
I already had a small tin of Dylon dye in the colour Cherry Flame, so I thought that would work, however after reading the instructions I found that the dye was not colour fast and I started having doubts.
Colour fast dye does not wash out in the wash, and since the aim of the material is to be used as an embroidery base and trim on a woolen coat then being able to wash it without it running over the other materials was a necessity. So another trip to the local fabric store was made and I chose another dye.
There are several types of dye to choose from - machine dye, cold wash and hot wash to name three that I saw today. My suggestion is to read the packets and find one that is suitable for the type of material and what you intend to do with it. I chose Dylon Colourfast Dye, which is a permanent dye for natural fabrics, in the colour Cherry Red.
Even though the instructions on the Silk Noil said "dry clean only" I have read that as long as the material is treated in the way that you will wash it after it is made into a garment it should be ok. So I threw it in the wash on a quick cycle to clean and prepare it for dying. This means that the material is now pre-shrunk and I should not have any problems washing the coat in the washing machine in the future (hopefully).
I followed the instructions from the dye packet to prepare my dye bath - yeah I haven't used natural dyes for this, but at least for my first go I'm doing it in a tub! I found from reading the different types of dye in the store that for silk a dye bath is probably going to be better than trying to use a machine dye and doing it in the washing machine anyway.
I have ended up with a dye mix of about 7 litres, so you need quite a large container to do it in. I also highly recommend the use of gloves. I had to agitate the material for the first 15 minutes of the dying process and I can only imagine the lovely colour my hands would be for weeks without gloves.
I completed the first dye cycle, however after drying I found that the colour wasn't dark enough, therefore instead of the lovely shade of deep pink that had arrived I purchased another lot of dye and repeated the process... The second dye was a different brand and cheaper. Rit dye in a scarlet colour.
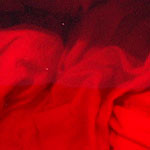
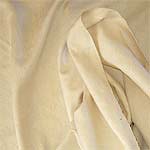
Here is the colour of the fabric before dying, during the dying process and after the process was completed. This colour could have been obtained in Medieval times using valuable cochineal beetles.
Wednesday, August 10, 2005
Practice "Boffer" Spears
At Conferention 2005 we witnessed single handed spear practice by other re-enactors, most notably the Stoccata School of Defense and decided to bring it back to Adelaide. Therefore the first step is making the spear!
Difficulty: Easy
Total Time: 2 hours
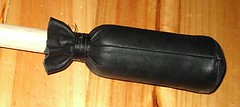
Inside the leather cover is several layers of felt. We cut a rectangle of felt then glued it in a cylinder around the staff building up about 2-3 layers. We cut a smaller amount of felt to plug the top where the spear goes through and then cut a circular shape for the end.
The cover was made by sewing a rectangle and a circle of leather together. The cover is quite tight and was worked over the felt. It fits quite snuggly. At the bottom of the felt the leather was bound tightly with string to prevent the leather or felt from moving, especially while the glue on the felt set.

Saturday, August 6, 2005
Centre Grip Shield
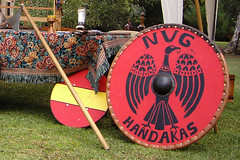
This centre-grip war shield was tried in battle, found to be a little heavy and transformed into a sign for our club. The principles and materials in making this sort of shield are the same no matter the size.
Difficulty: Medium
Total Time: 10 hours
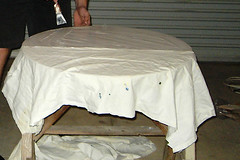
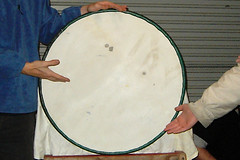
Take your circle of wood and affix an old sheet to one side using PVA glue. While this is drying take a length of hose and cut a slit along the length of it. When the glue is dry cut the excess sheet away and then work the hose around the circumference of the shield. This is hidden by leather in one of the next steps and gives the shield a longer lifetime.
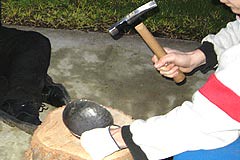
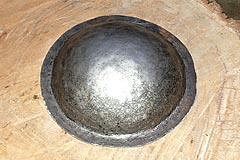
Usually a centre grip shield requires a boss in the centre. This is easy to make with the right equipment. We used a wooden stump which has a dish in the centre - a depression or hollow that is used for forming the shape into metal. You can use a sander to create a hollow in your stump which is usually around 4-5 inches in diameter and about an inch deep. We used a ball pein hammer which was modified by my partner for the task. Hammer's should be kept highly polished because any flaw in the hammer is transferred to the metal surface every time the hammer strikes.
Working in spiral courses, start from the outside and work inwards. Space the blows as evenly as possible to prevent malforming and stress on the metal. Each hammer stroke should overlap slightly with those around it. There are many good books you can get for more information on metalwork and armour making.
With all the pieces now ready, we cur a circular hole to fit the boss into the shield. The handle is a shaft of wood with notches cut in either end so that it sits flush against the shield into the inside of the hole. This was riveted first, then the boss was also attached with rivets. If you have a rivet former it is even easier to crete and maintain the nice curved finish of a rivet.
The shield was initially painted red and then the protective layer of leather was riveted around the outside. Later the black artwork was added and this particular shield is now used as our sign at events.
Wednesday, June 1, 2005
Amber
Amber is fossilized resin which has succinic acid present in its chemical makeup. It begins as resin tree sap drippings and progresses into copal then amber as it fossilises, which can take millions of years. To transform from resin to copal and then to amber relies on polymerisation and terpene evaporation.
There are three commonly known amber types that are available today - Baltic amber, Dominican amber and “young amber”.
Baltic amber is one of the best known authentic ambers. It was deposited as sap oozing from now-extinct resinous trees as much as 50 million years ago and laid down in deposits through what is now the coast of the Baltic Sea as well as parts of Russia. The Kaliningrad Amber Factory in Russia produces 90% of the world’s amber.
Dominican amber was deposited approximately 10 to 25 million years ago in what are now the Dominican amber.
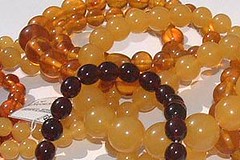
More recent, but still valuable is the “young amber” deposited by deciduous trees in what is now Poland from 10000 to 1 million years ago. The reason from this type of amber is not properly amber and should more correctly be called copal (pictured below right). A similar substance, Kauri Gum, can be found in New Zealand.
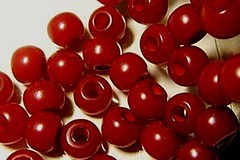
Tibetan amber is NOT real amber. In my experience this is a cheap plastic substitute that is commonly found on e-bay. Also be aware that some glass beads are called “amber” due to their colour alone, however I have had success through e-bay when searching on “Baltic amber” (pictured below left) and observing the appearance of the beads; especially look for the swirls that are formed by slow gradual oozing prior to fossilisation.
Baltic amber can have succinic acid present between the ranges of 3 to 8 percent. Amber which is clear usually has lower levels of succinic acid and increases as the amber becomes more opaque.
One of the best tests on real amber is the hot point test. It involves heating up a piece of wire or similar equipment and poking it into an inconspicuous place on the item being tested. Amber should give off a pine gum or resinous smell and the slight puncture mark may appear white.
Historically, amber beads were made by taking a block of amber, cutting it roughly to shape and drilling a hole through. Its final shape was attained by turning it on a bow lathe before polishing. The Vikings produced many different amber articles, including wedge shaped beads and amulets, sometimes even playing pieces for games.
In Viking mythology amber was formed from Freya’s tears. She was married to Odur the god of sunshine, but when he left her to roam in distant lands she followed him weeping. Her teardrops changed to gold in the rocks and amber in the sea.
Amber is said to clean and purify the system of the wearer. The aura of this stone is believed to act on endocrine and digestive systems. Its magnetic properties (rubbed against wool, amber attracts paper) is believed to be beneficial against fatigue and depression. Amber brings joy to life and gives the courage necessary to overcome anxiety. Stone of the sun, amber warms the heart in literal and figurative sense and is believed to be a good remedy for colds and flu.
Additional Resources
Amber Gallery - Fakes and Amber Tests
Viking Answer Lady - Amber
Regia Anglorum - Glass and Amber
Friday, May 13, 2005
Raven Banner
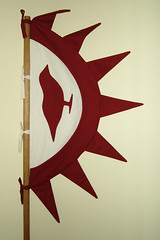
The Raven standard is pictured in the Bayeux Tapestry and while Norman, has a very recent Viking heritage. It is depicted mounted on a spear accompanying William the Conquerors army
Difficulty: Medium
Total Time: 7 hours
History
The Raven Banner is described in several literary accounts mention several battles including the battle at Cynuit in 878 CE. One account attributed the Raven Banner of Ubbe and a Danish army, which was defeated by King Alfred.
The Raven Banner is supposed to provide prophesy for the outcome of a battle. Some mention a banner with no embroidered image at all, whence a raven will magically appear upon it, beating its wings in victory or drooping its whole body in defeat.
The banner is mentioned again, and perhaps most famously, as a sigil of the Orkney Earls in connection with the Battle of Clontarf (1014 CE) and the battle at Dublin on Palm Sunday. The two saga’s describing these events – Orkneyinga Saga and Njal’s Saga describe the banner’s infamous curse, death to any standard bearer. “Now, take this banner. I've made it for you with all the skill I have, and my belief is this: that it will bring victory to the man it's carried before, but death to the one who carries it.”
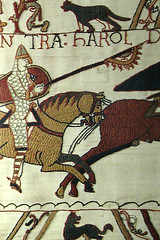
The Anlaf Sihtricsson coin minted at York in 924 may depict the Raven Banner. While it cannot be confirmed, the banner shows a triangular design with rectangular tassels hanging from the lower edge. In the scene of the Bayeux Tapestry where the brothers of Harold Godwinsson are slain a similar banner is depicted falling under the hooves of a horse. Unfortunately no design is shown on the flag to confirm the presence of a raven on the coin.
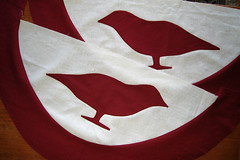
The Bayeux Tapestry depicts a second banner as the Normans ride into battle with a clear representation of a bird on a semi-circular banner, which may be the famous Raven. There are as many similarities as there are differences between this second banner and the coin.
Some scholars question why the Bayeux Tapestry should depict a Raven Banner in the hands of a Norman warrior. Two suggested answers include reference to an unrecorded Viking leader among William’s troops, or possibly an oblique reference to the Normans’ origin as Vikings under Hrolf der Ganger.
Construction
I created my pattern first out of newspaper working the white semi-circle to the maximum size the paper would allow and aiming for the rough proportions shown in the Bayeux Tapestry.
I cut the red border and the bird shape – two of each piece, one for each side - and also two white semi circles from linen material.
After sewing on the border to each white semi circle, I cut slits all the way around the inside seam, about an inch apart and just into the stitching. This allows the curve to sit better, which I ironed into place.
I pinned the bird shape, making sure that the bird was facing the top of each side in order to get "mirror images". Then I stitched it on, carefully rolling the edges in as I went to prevent fraying.
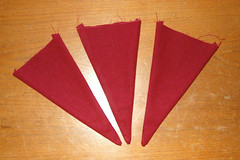
After stitching both of the birds on I created a pattern for each of my triangular flags. After three size checks I discovered that 20cm long and about 10cm wide worked the best. I allowed a seam edge and cut out 9 pairs, which I stitched together then turned and pressed with the iron.
After laying out my triangles with the semi-circular banner I found that I only needed 7, which I pinned on the inside and aligned the second semicircle. All of these layers were sewn together. Then I sewed down just the white area on the flat side.
NOTE: When you sew on the triangles remember that you want to sew right sides together, which means that your triangles end up inside the flag. When it is turned they will be on the right side.
I carefully turned the whole lot inside out through one of the small holes left in the red, then sewed up the holes.
The ties are made of 2cm wide tubes – I cut 6cm wide strips about 60-70cm long and turned them inside out after sewing, pressing them flat with the iron. Then I folded them in half and sewed them onto the banner at even intervals. After trimming and finishing off the ends by hand they are each about 20cm in length.
They are tied to the spear pole with a half bow which seems to hold them quite well and allows them to be removed and fixed to any other size poles if need be.
Additional Resources
The Vikings – Osprey Elite Series
The Bayeux Tapestry - David M Wilson
Viking Answer Lady - The Raven Banner
Difficulty: Medium
Total Time: 7 hours
History
The Raven Banner is described in several literary accounts mention several battles including the battle at Cynuit in 878 CE. One account attributed the Raven Banner of Ubbe and a Danish army, which was defeated by King Alfred.
The Raven Banner is supposed to provide prophesy for the outcome of a battle. Some mention a banner with no embroidered image at all, whence a raven will magically appear upon it, beating its wings in victory or drooping its whole body in defeat.
The banner is mentioned again, and perhaps most famously, as a sigil of the Orkney Earls in connection with the Battle of Clontarf (1014 CE) and the battle at Dublin on Palm Sunday. The two saga’s describing these events – Orkneyinga Saga and Njal’s Saga describe the banner’s infamous curse, death to any standard bearer. “Now, take this banner. I've made it for you with all the skill I have, and my belief is this: that it will bring victory to the man it's carried before, but death to the one who carries it.”

Documentation
The Anlaf Sihtricsson coin minted at York in 924 may depict the Raven Banner. While it cannot be confirmed, the banner shows a triangular design with rectangular tassels hanging from the lower edge. In the scene of the Bayeux Tapestry where the brothers of Harold Godwinsson are slain a similar banner is depicted falling under the hooves of a horse. Unfortunately no design is shown on the flag to confirm the presence of a raven on the coin.
The Bayeux Tapestry depicts a second banner as the Normans ride into battle with a clear representation of a bird on a semi-circular banner, which may be the famous Raven. There are as many similarities as there are differences between this second banner and the coin.
Some scholars question why the Bayeux Tapestry should depict a Raven Banner in the hands of a Norman warrior. Two suggested answers include reference to an unrecorded Viking leader among William’s troops, or possibly an oblique reference to the Normans’ origin as Vikings under Hrolf der Ganger.
Construction
I created my pattern first out of newspaper working the white semi-circle to the maximum size the paper would allow and aiming for the rough proportions shown in the Bayeux Tapestry.
I cut the red border and the bird shape – two of each piece, one for each side - and also two white semi circles from linen material.
After sewing on the border to each white semi circle, I cut slits all the way around the inside seam, about an inch apart and just into the stitching. This allows the curve to sit better, which I ironed into place.
I pinned the bird shape, making sure that the bird was facing the top of each side in order to get "mirror images". Then I stitched it on, carefully rolling the edges in as I went to prevent fraying.
After stitching both of the birds on I created a pattern for each of my triangular flags. After three size checks I discovered that 20cm long and about 10cm wide worked the best. I allowed a seam edge and cut out 9 pairs, which I stitched together then turned and pressed with the iron.
After laying out my triangles with the semi-circular banner I found that I only needed 7, which I pinned on the inside and aligned the second semicircle. All of these layers were sewn together. Then I sewed down just the white area on the flat side.
NOTE: When you sew on the triangles remember that you want to sew right sides together, which means that your triangles end up inside the flag. When it is turned they will be on the right side.
I carefully turned the whole lot inside out through one of the small holes left in the red, then sewed up the holes.
The ties are made of 2cm wide tubes – I cut 6cm wide strips about 60-70cm long and turned them inside out after sewing, pressing them flat with the iron. Then I folded them in half and sewed them onto the banner at even intervals. After trimming and finishing off the ends by hand they are each about 20cm in length.
They are tied to the spear pole with a half bow which seems to hold them quite well and allows them to be removed and fixed to any other size poles if need be.
Additional Resources
The Vikings – Osprey Elite Series
The Bayeux Tapestry - David M Wilson
Viking Answer Lady - The Raven Banner
Thursday, March 10, 2005
Silk
Silk is made from the unwound cocoons of a particular group of moths. The oldest silks date back to 1500 BCE in China, although the word “silk” in Chinese is known to be older than that. The establishment of the Silk Road between 140-60 CE marks the beginning of silk use in the West.
Silk feels gorgeous, however unless you are portraying someone extremely wealthy (and have all the accessories to go with your', 'outfit) it would not be recommended to make an entire garment out of silk. The most common use for silk in our era was for trims (collars, cuffs, and decorative accents).
Fabric Types
There are many types of silk available to us today, and they differ in quality and price, however the following are ones that are known to be of our period.
Noil (Raw Silk)
Often called “raw silk”, Noil is characterised by a nubbly texture and the subtle flecks that are actually particles from the silkworm’s cocoon. It has a muted sheen, resists wrinkles, is softer than linen and is excellent for clothing.
Habutai
This silk is soft, lightweight and lustrous with a smooth surface. It means “soft and downy” in Japanese and is a very versatile silk fabric.
Samite
Twill-faced patterned silk. This was the weave used in ancient Persian and Byzantine figured silks.
Care
Silk is a fibre made of protein like wool or hair, therefore some detergents that are made to dissolve protein stains may weaken silk over time. It can be washed, however it is recommended garments be washed by hand. Try a baby shampoo or use soap which is different in chemical composition than a detergent.
Dry cleaning is optimal as some silk dyes used during manufacturing may lose their brilliance through normal washing.
How it is Made
Silk thread is obtained by carefully unravelling silk worm cocoons and reeling the silk onto spools. First the cocoons are soaked in water to make them easier to reel, then the start of each thread is found - one thread per cocoon. Michael Cook from Wormspit states that an ounce of reeled raw silk is equivalent to about 250 cocoons and can be created in an evenings work.
Silk can also be made by spinning. The cocoons need to be degummed and carded, much like wool.
Additional Information
Virtue Ventures - Silk
Winter Fabrics - Silk Types
Worm Spit
Natural Dyes
Many people believe that in order to look medieval, you can only use very plain, natural colours. It is actually possible to produce a myriad of colours using natural dyes, and even very bright ones.
The most difficult colours to dye are greens and very bright red, thus these colours were more expensive. Pure black and pure white were also very uncommon, where “black” is usually very dark with a brown or blue tinge and pure white can only be obtained through ', 'extensive treatment and sun bleaching.
A Viking black was created by mixing three of the most expensive dyes: cochineal, woad and weld. The Vikings also had their own method of creating brilliant white, however again it was very expensive.
If you are portraying a Byzantine peasant then you will wish to avoid purple. It was considered an imperial colour, and culturally only worn through special privilege and rank. A very wealthy Byzantine persona may consider wearing a small piece of purple cloth.
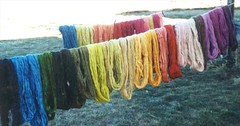
Other colours to avoid are very bright fluorescent colours; however some bright blues and yellows can be obtained. The image below demonstrates many colours that have been obtained using natural dyes that were available during the medieval period.
Dye Equivalent Colours
The following table highlight a selection of some of the more commonly known colours and a modern dye equivalent for obtaining this colour.
Additional Information
Black in Period
Craft of Natural Dying
Dye Equivalent Colours by Regia Anglorum
Medieval Dyes
The most difficult colours to dye are greens and very bright red, thus these colours were more expensive. Pure black and pure white were also very uncommon, where “black” is usually very dark with a brown or blue tinge and pure white can only be obtained through ', 'extensive treatment and sun bleaching.
A Viking black was created by mixing three of the most expensive dyes: cochineal, woad and weld. The Vikings also had their own method of creating brilliant white, however again it was very expensive.
If you are portraying a Byzantine peasant then you will wish to avoid purple. It was considered an imperial colour, and culturally only worn through special privilege and rank. A very wealthy Byzantine persona may consider wearing a small piece of purple cloth.
Other colours to avoid are very bright fluorescent colours; however some bright blues and yellows can be obtained. The image below demonstrates many colours that have been obtained using natural dyes that were available during the medieval period.
Dye Equivalent Colours
The following table highlight a selection of some of the more commonly known colours and a modern dye equivalent for obtaining this colour.
| Dye | Paterna | D.M.C. |
|---|---|---|
| Indigo from murex | 540 | 7319 |
| Shellfish (non-specific) | 300 | 7895 |
| Weld and alum and urine | 711 | 7784 |
| Weld | 760 | 7473 |
| Madder over Woad | 723 | 7767 |
| Madder | 861 | 7920 |
| Madder and alkali | 930 | 7184 |
| Madder and copper | 871 | 7446 |
| Woad | 524 | 7692 |
| Woad over weld | 691 | 7769 |
Additional Information
Black in Period
Craft of Natural Dying
Dye Equivalent Colours by Regia Anglorum
Medieval Dyes
Monday, February 28, 2005
Treasure Necklace
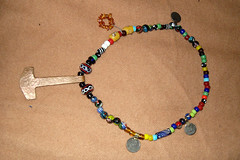
The Vikings loved their colourful glass beads and different findings and sometimes pieced them together to form muddled necklaces full of colour and "treasures".
Difficulty: Easy
Total Time: 2 Hours
Documentation
Finding beads today that would have been available during the Viking era can be a daunting task. I went to a local bead shop armed with colour print-outs from various websites and spent a good hour looking through different beads and picking out a couple here, one there, a half dozen somewhere else. Some beads I even found on e-bay and had them shipped specially.
These are just a small selection of beads which I managed to find replicas for today (extant on left):
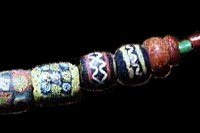
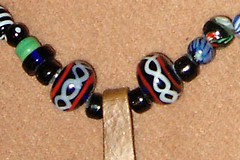
The large red, white and black bead is similar to the ones from the necklace manufactured in Scandinavia c 800 to 1000 CE. This extant necklace also includes some millefiore beads, demonstrating that this type is not post-rennaisance.
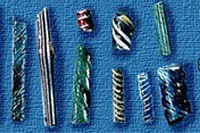
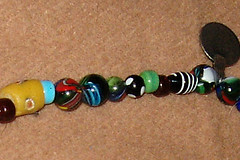
The glass debris displayed here were found in a Viking Age glass-worker's shop in Ribe, Denmark and are reminiscent to several that I included on my necklace. This segment of my design also shows millefiore beads and an eye bead.
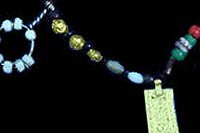
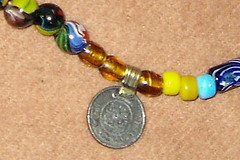
This is a 9th cent. treasure necklace from the hoard from Hon in Norway. It is special in that it contains many golden pieces, whereas most featured silver items. I am displaying a segment that includes gold foil beads , a pendant of glass beads woven onto wire, and a pendant hanging from an attached loop. My design includes gold foil beads and a pendant with amber (later removed in favour of a fourth coin pendant), but shown is an old Islamic coin (1920's?) made into a pendant.
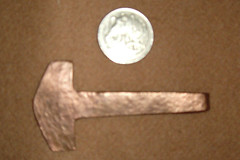
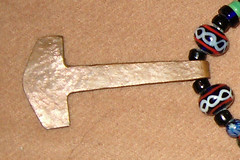
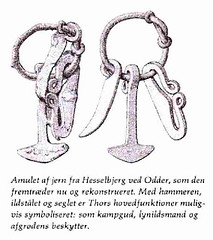
Hammers of this general type were distributed widely. They were cut from a single sheet, and the top was bent over to form the loop. The one I re-created is modeled after one found in Hesselbjerg, Denmark and I made it out of a piece of brass. The basic shape was cut with tin snips, then the edges were filed smooth. Next we used a hammer to "weather" the brass and make a little loop at the top and lastly it was polished. Pictured is my re-creation with an Australian 20 cent piece and the hammer on the necklace.
Construction
The difficult thing about constructing a treasure necklace is to throw away all of our modern concepts of form, colour and symmetry. The Vikings prized a mixture of colours and collected many types of beads and items converted to serve as pendants.
The Viking Answer Lady offers directions for the construction of a treasure necklace and we shall follow them.
Step One: Arrange special beads and pendants
I started by laying out the coin pendants and the special Thor's Hammer in a rough circle on my table in approximate distances from each other.
Step Two: Make more pendants if desired with beads and wire
I created a pendant by stringing tiny amber chips onto a length of wire and then twisting the ends together to form a "stalk" which is used as the loop of the pendant. This technique seems to be used mainly to highlight a group of special beads - either the same colour, or ones that are more precious or loved than the others.
Step Three: Place pairs of beads 180° apart across the necklace
Pick up pairs of beads that are similar in size, shape and tone (dark or light) and place them approximately 180° apart across the circle. The beads do not have to be exactly the same colour.
Step Four: Create some short patterns and place remainder beads
Pendants were often emphasised with short patterns, or the same type of bead either side of them. I constructed patterns using my special gold foil beads, or in the case of the Thor's Hammer, by setting it off with my large glass beads. I also set off pendants by using the same colour and type of bead to either side of it.
Step Six: Pick a point and string your necklace
I picked the point I thought would be at the back of the neck to string my necklace. I threaded it on a heavy linen thread that I waxed prior to stringing.
Additional Resources
Thor's Hammer - Extant Photos
The Viking Answer Lady - Viking Beads
Subscribe to:
Posts (Atom)

