My Other Sites: Costume Wardrobe Portal | Costume Wardrobe Blog | The Quilted Hen Blog | Happy Bobbin Blog | Backyardhens Blog

Wednesday, December 13, 2006

Earrings

I wanted something special for a Christmas present. Then I was going through my old jewellery and found my pearls and amber and remembered at the same time I'd bought a few different gemstone beads, so I decided to make something.

Difficulty: Easy
Total Time: 1 hour

These aren't hard to make, they're just fiddly. I never knew that hand crafted jewellery could look this good though. I really like using jump rings and head pins. I bought myself some earring hooks and silver chain as well as the pretty heart spacer charms and put it all together with some real garnet and real peridot. The only other things needed are two pairs of small pliers and a bit of patience coupled with some creativity.

Earrings Earrings


The first set are garnet (2 x 6mm and 18 x 4mm), 2 heart accents,  10 head pins, 12 jump rings and 2 earring hooks.

The second set are peridot (2 x 5mm, 6 x 4mm), 2 jump rings, silver chain and 2 earring hooks.

Thursday, December 7, 2006

Petticoats

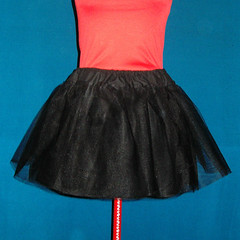
After listening to advice about working with netting I have finally achieved a lovely Lolita petticoat with lots of "poomf"! These petticoats form the integral part of the "bell shape" which is typical in Lolita style clothes.

Difficulty: Easy
Total Time: 4 hours

These petticoats really aren't all that hard. I now know that I simply made some errors in fabric choice and was far to gentle which proved the downfall of my first petticoat.

First get a decent cotton or poly/cotton as the base of the petticoat. You really don't want to work with anything shiny, slippery or light weight because you just won't be able to sew the netting to it.

Second, get yourself some netting. You want the normal netting, not the bridal stuff because the bridal netting is just too thin and doesn't give that nice "poomf" when you put your garments on overtop.

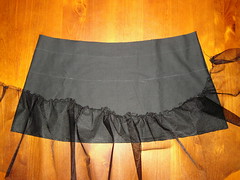
The petticoats from Gosu Rori magazine have a tapered shape as the base of the skirt. Sew the two halves together and then mark out where you will sew the netting to make it easier to pin and control. Hem the bottom of the petticoat now if you need to because the netting will make that hard later on. Put this part aside for a minute.

Cut out your lengths of netting (mine were one length of 2.6m x 33cm and one length of 1.6m x 25cm) and gather one side. Pin one length along the line on your base material and stitch into place. Then pin the next length along the other line and stitch.


Sew your waistband onto the top of the skirt and insert your elastic, and you're done!

You can be quite rough with the netting. You won't hurt it!! Make it conform to where you want to sew... and worse case - remember it is going under your garment and doesn't need to look perfect.

If you find the netting is scratching on your legs you might have made the netting ruffles a little too long. Trim them a centimetre or two all the way around so that the netting is above the cotton base and then the cotton should protect your legs.

Wednesday, December 6, 2006

Bunny Bag

After deciding to do a Lolita version of Alice in Wonderland for the Fairy Tale Picnic event I remembered I had a pattern for a Sweet Lolita bag that was in the shape of a white rabbit. There is no better accessory to hide my wallet and keys!!

Difficulty: Easy
Total Time: 6 hours

I photocopied the pattern out of Gosu Rori vol 4, but the pattern itself could be adapted to any soft toy where you can put a zip up the back. I only got cheap toy fur because I am probably only going to use the bag once and at the beginning I wasn't sure how it would turn out and didn't really want to spend up to $60 on fur. So my "scrooge" side won out on this one.

I used about 60cm of fake fur. One tip is to make sure you pay close attention to the way the fur will go. I drew each piece on to the back of the fur, but if you do that make sure you two each of the front and back of the pieces (ie. you need to turn over your paper pieces and do the other side too)


Next carefully cut the fur out. Because the fabric is fur you need to try to cut between the fur follicles. You can see why by having a look at where the shop assistant cut the fur. It is all ratty because the fur was cut through. You need to try not to cut through the fur, just the backing material.

Finally you can start to sew the pieces together. For the head I sewed the ears into the top seams where the gusset joins the sides of the head together. The arms, legs and ears are all relatively straight forward to sew together. After each piece is together turn it the right way and carefully pull the fur out of the seam lines.

The instructions for the body didn't include a lining for the bag itself and I wondered how the bunny would look if it had my wallet, keys and other things inside without having a little stuffing in there too so that he keeps his shape. I used the original body pattern to draw a smaller shape for my gusset and cut it out of white cotton. First I sewed the zip onto the fur and sewed around the fur leaving a small opening in the front. Next I sewed both pieces of cototn lining to the zip as well so that all the seams would end up in the bunnies tummy. Then I sewed around the lining without leaving a gap. I could turn the stomach in the right way through the gap in the fur seam and then after attaching the arms and legs (described next) I lightly stuffed either side of the stomach lining.


I used some blue toy eyes and some simple plastic arm and leg joints which you can get from the "teddy bear" area in your craft shop. With some of these things you either need to be quite strong to put them together, or use a pair of pliers. You can join each of the arms and legs to the body and then stuff the arms and legs and sew the holes closed.

Finally the head is stitched to the top of the body with a piece of ribbon coming out of the back of the neck seam as a handle. Then I added some lace and a blue ribbon around his neck and stitched on his nose with black cotton embroidery thread.