
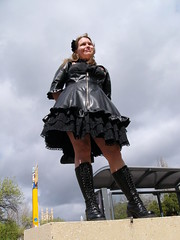
Difficulty: Medium
Total Time: 51 hours
The dress itself consisted of a petticoat skirt, under dress, overdress and a hairpin. Gosu Rori magazines have pattern sheets in the back with pages of instructions (in Japanese of course) which I needed to decipher.

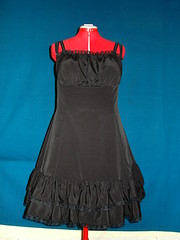
Underdress
With this part of the outfit I felt like I really started utilising my dress-dummy for the first time. Because my breasts are quite a lot larger than a typical Japanese girl I had several issues with this pattern. Initially I knew that the body of the pattern would fit because it was directly adapted from the overdress pattern which I had done a mockup for. So I sewed the main parts together and pinned it in approximately the right spot on my manaquin. The straps were a real trial. I had at one stage about 6 paper variations and got so sick of cutting little pieces of paper that I ended up just making on to see how it went and luckily it seemed to work.
The invisible zip was another episode entirely and I think I will write a seperate article about that. I learnt from a friend that you need to buy an invisible zip foot from your local sewing shop (ie Spotlight). I fitted the foot to my machine and spent a while looking at how it was it would work. Then I tested it on a spare zip I had bought and it was a DISASTER! The foot kept slipping sideways and I would end up sewing over the zip and at one point I got so angry that I just had to stop and nearly gave up entirely.
After wishing I had 6 arms I managed to hold the zip (which I basted first - yes basting is sometimes very handy so don't be slack!), the foot, the material, put the foot down and work the machine (phew) and somehow slowly and miraculously I got the zip sewn in.
The front was interesting again and I completed the ruffles on the bottom well before I had solved the problem of how I would cover my boobs. I had already followed the pattern which just did not work although it looked great on my dummy at which point my friend gave me another idea. Put your bra on your dummy! So thats right, my dress-dummy now wears a stuffed bra and I am thinking of making something a little more permanent.
I ended up with a piece about three times bigger than the pattern which is gathered along the bottom and has lace and elastic along the top. That was sewn in carefully and thankfully not only covered my modesty, but also looked great!
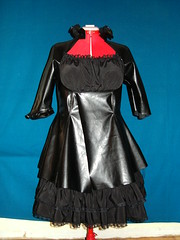
Overdress
Firstly a warning for everyone: Vinyl does not take kindly to pins or unpicking because you will end up with small holes in your fabric. I had to draw each piece of the pattern with tailors chalk because I could not pin my pieces to the material. I did pin around the outside of the pattern though so that the material would not slip and I utilised pins carefully when doing the ruffles in areas inside the seams.
Secondly vinyl is slippery. While sewing the pieces wasn't too hard because there is a material-like backing, I wanted to sew the seams so that there were two lines of stitching parallel to the seam. I had to reduce the tension of the feeders so that they would not leave marks on the front of my garment and carefully help the fabric through the machine by pulling from the back as I slowly stitched. The effect though was very very nice.
The ruffles were quite fiddley to complete and time consuming to gather evenly and then pin and slowly sew. Each seam has stitching next to the seam and this is the reason why the ruffles sit so nicely because the seams are actually pressed flat and open when the secondary stitching is complete.
The zip in this case was quite easy and I chose a nickel coated open ended jacket zip. Also the fold lines that I originally had from my material being stored for a month fell out over the period of sewing. Do NOT iron your vinyl, but you can apparently heat it softly with a hair dryer and any creases you do get will fall out. I did not try this as the weight of the garment hanging on my dress-dummy meant the creases disappeared during construction.
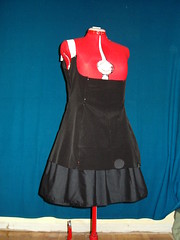
Unfortunately I don't have many progress shots of this part of the costume because I ended up doing most of the construction over two long nights and I completely forgot! The only thing this progress shot is missing is the bottom ruffle and a couple of hook and eye clips on the collar.

Hair Pin
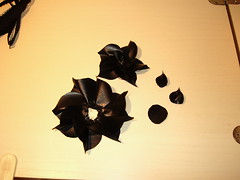
The pattern for the hairpin consisted of about two dozen little hearts - 8 large, 5 medium and 7 small - and a circle for the back. Each heart is folded and then sewn along the bottom. Then each heart is sewn in a circle. I found it easier to sew each heart together one by one rather than trying to pin and sew all of them at once.
The layers are built up. You can see from the image that i have two hearts that I have not sewn in yet (they went in the middle of the 5 hears small circle sewn in by hand) and in the image I have already hand sewn the small set of hearts to the medium set. Next I sewed the two small hearts into the middle and then sewed the large hearts together. The circle covers the seams and then the bobby pin is sewn to that.
This is quite a large flower, but it is extremely effective and I got several positive comments though I don't know if many people realised that I had made this part of my costume as well.
WOW!!! That really kool! I lie to know how to make my own Gothic Lolita. I gotta know how long it take to make one? Oooh that so pretty!!!
ReplyDeleteThanks! As I said in the article, it took about 50 hours for me to make the complete outfit.
ReplyDeleteI think this dress is very beautiful!! I would love to make something like that, however it's far too hot here in Puerto Rico to wear vinyl. To me it seems like a daring move incorporating vinyl in Lolita, but it seems worth the risk. Truly beautiful!! ^-^
ReplyDeleteThanks for your comment!
ReplyDelete