
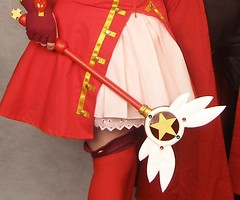
Difficulty: Hard
Time: 20 hours
By breaking your object into its basic shapes you can get an idea of the kind of things you will need to make it. I started with a piece of dowel, some PVC pipe and cardboard.
I cut the PVC pipe so it was the same thickness as the dowel with a hacksaw and drilled 5 holes with a hand-held hobby drill at equal distances. To gauge the distances I marked a circle on a piece of paper with a compass and then used the compass to mark 5 equal lines on the circle, which can then be joined to form a star as a guide. I fed through thin copper wire to form a base for my star so that it would be solidly suspended in the PVC pipe.
The PVC pipe section was stuck to the dowel with liquid nails and allowed to set over night. Then I started building up the outside of the PVC pipe with paper clay (DAS). Over all this method is a little heavy, but is very easy to mould, air dries hard and is able to be sanded and painted, which was a benefit of this material over other options.
Once I was reasonably happy with the outside of the PVC pipe I cut out 4 stars from cardboard and glued them either side of the copper wire so that they built up the centre star. You can’t tell there is wire in the centre, but this gives strength to the star as only the points are touching the PVC pipe base. I used Tarzan's Grip glue as I have never had a problem with it not sticking to just about any surface. I actually stuck the cardboard either side together, so the copper wire suspends the star, but it is actually that the cardboard is glued together which holds it in place.
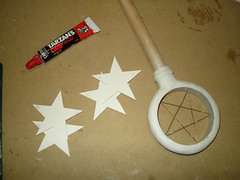
The wings were constructed with a cardboard base and built up with DAS. I found that because the paper clay starts off wet the cardboard warped a little, but that added to the effect I was going for. This was sanded and then painted separately to the main wand. This did leave the wings very delicate and after a couple of wears of this costume (and traveling interstate with it twice) I discovered hairline fractures around the base of the wings. Airline security also loves to touch this sort of thing regardless of how much bubble wrap you have it in and how much you tell them to please be very careful as it is a cardboard sculpt that is quite fragile. Hence the corners of the wings are now a little dog-eared. Thanks airline security!
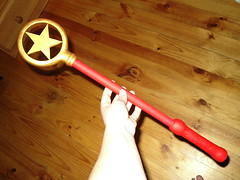
The best gold paint I found was for folk art, and though it is a little on the expensive side it paints very nicely and has a more realistic gold colour. It took at least 3 coats to build up a decent covering. When all the pieces were painted the wings were glued to the outside of the star and the cross for the bottom was glued into its slot. (The cross is actually 3 layers of cardboard with a tab that slides into a slot in the handle to give it strength - the part has broken off in travel, but glued back in with no noticeable damage)
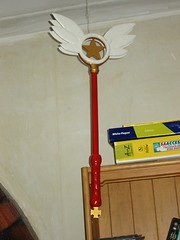
Lastly the whole lot was coated in several layers of clear coat and the 8 gems were glued into position on the wings.