Difficulty: Easy
Total Time: 3 hours
I already had a small tin of Dylon dye in the colour Cherry Flame, so I thought that would work, however after reading the instructions I found that the dye was not colour fast and I started having doubts.
Colour fast dye does not wash out in the wash, and since the aim of the material is to be used as an embroidery base and trim on a woolen coat then being able to wash it without it running over the other materials was a necessity. So another trip to the local fabric store was made and I chose another dye.
There are several types of dye to choose from - machine dye, cold wash and hot wash to name three that I saw today. My suggestion is to read the packets and find one that is suitable for the type of material and what you intend to do with it. I chose Dylon Colourfast Dye, which is a permanent dye for natural fabrics, in the colour Cherry Red.
Even though the instructions on the Silk Noil said "dry clean only" I have read that as long as the material is treated in the way that you will wash it after it is made into a garment it should be ok. So I threw it in the wash on a quick cycle to clean and prepare it for dying. This means that the material is now pre-shrunk and I should not have any problems washing the coat in the washing machine in the future (hopefully).
I followed the instructions from the dye packet to prepare my dye bath - yeah I haven't used natural dyes for this, but at least for my first go I'm doing it in a tub! I found from reading the different types of dye in the store that for silk a dye bath is probably going to be better than trying to use a machine dye and doing it in the washing machine anyway.
I have ended up with a dye mix of about 7 litres, so you need quite a large container to do it in. I also highly recommend the use of gloves. I had to agitate the material for the first 15 minutes of the dying process and I can only imagine the lovely colour my hands would be for weeks without gloves.
I completed the first dye cycle, however after drying I found that the colour wasn't dark enough, therefore instead of the lovely shade of deep pink that had arrived I purchased another lot of dye and repeated the process... The second dye was a different brand and cheaper. Rit dye in a scarlet colour.
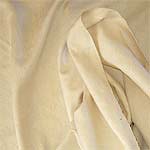
Here is the colour of the fabric before dying, during the dying process and after the process was completed. This colour could have been obtained in Medieval times using valuable cochineal beetles.


No comments:
Post a Comment