My Other Sites: Costume Wardrobe Portal | Costume Wardrobe Blog | The Quilted Hen Blog | Happy Bobbin Blog | Backyardhens Blog

Thursday, March 12, 2009

Putumayo Skirt Replica

Skirt Replica

I began this skirt after a burst of inspiration. This is the tartan that I found in a remnant bin for $2 and I also had left over black cotton. I had to get half a metre more of black. After the first weekend I have it almost complete. I still need to make 3 more bows, but I haven't been able to get silver badge backs so that they will be removable. Perhaps I should just sew the bows onto the skirt. I also need to sew on the waist band.

The pattern for the skirt is from Gosu Rori magazine volume 12. The finished skirt will look something like this.

Saturday, January 17, 2009

Altered Designs

Dragonfly Pendant

One of my steam punk pieces arrived last week and It was amazingly wrapped in tissue paper and done up with a ribbon like a present. It is so nice when ebay sellers take the time and care to make your purchase memorable.

The piece is a heart and dragonfly combination on a long brass chain. Other pieces like this can be found through her ebay store "Altered Designs" and are quite affordable if you are looking for something a little different.

Cameo

I have also purchased a cameo today that looks old fashioned enough for my tastes. I fear it is not "real shell" as stated, but still it might end up being one of the cheaper plastic cameos from up to 50 years ago as it looks like the setting is cast metal. While it is missing a stone in the corner I hope to either be able to replace it cheaply or fix it either by taking out the one in the other corner and adding cogs to give it a steam punk feel, or taking out all the stones and replacing them with something appropriate. I guess I shall see when it arrives in the post!

Tuesday, September 16, 2008

Red Skirt

Red Skirt

This Lolita skirt was made following the instructions from Gosu Rori volume 7 from the skirt on page 11. The lace is applied to all the seams and the front and back panel has some delicate pin tucks which I think stand out better with my colour choice.

Difficulty: Easy - Medium
Total Time: approx 6 hours

It is hard to explain the actual shapes of the pieces for this skirt. There is a thin band for the bottom with the lace attached, but the rest is made out of pieces. The zip is in the side (though on the pattern the zip is supposed to go in the back - I thought it was wierd having an extra seam in the back when there was a perfectly good seam that could take the invisible zip in the side, so I moved it)

First the front and back pieces are constructed. The pin tucks are sewn in the front, then the two pieces are joined and the seam covered with the lace that has satin ribbon threaded through. Next a wide panel is gathered and the front and back sides are sewn together and attached to the gathered edge. Then the whole lot is attached and the side lace is sewn over the seam as you see in the first picture, which just needs a trim, then the bottom frill and the waist band attached.

Construction Progress

The bottom frill is attached after the lace is sewn. The lace has already been gathered slightly when you buy it so all you have to do is sew it on. Make sure you get a nice cotton on cotton and not one that uses shiny polyester thread on the design. The material is gathered until it lines up with the skirt and then attached with lace applied over the seam again, then the top of the skirt is gathered into the waist band.

Tip: Try to line up any joining seams on the frill or lace with the seams where the pieces join so that all your seams line up and you minimize any seams that may seem out of place.

The most time consuming part of this project is all the gathering, but the end effect is definitely worth it and this is a relatively simple skirt. I have left off the satin bows that the pattern suggests as well as a large material bow for the back as I felt these were unnecessary and liked the simplicity of this design.

Ready for waistband

Unfortunately no pattern for this one at this time. The magazine has detained instructions on how to draft these pieces and I highly recommend picking up a copy if you can. They retail for approximately $25 and contain patterns for approximately 18 whole outfits.

I wore this skirt with an Anna House blouse to a meetup at the Zoo on a 40 degree day, so a parasol was a welcome accessory.

Tuesday, April 15, 2008

Dejiko Bells and Hat

DiGi Charat Group

Everyone’s favourite part of my Dejiko is my bells and it’s my favourite part too. The bells really do jingle!

To make them you need a couple of special tools, however they are fairly easy with a little patience.

The bells started life as a clear plastic decoupage ball – the kind you can get from many craft stores. They come in varying sizes, so you might want to take a small mirror and check their sizing against your head. I had many a strange look at my local craft store, which was very interested when they asked me what I wanted them for. Decoupage balls are designed to be taken apart, decorated and put back together, and they are quite strong and thick plastic.

I made my first cuts with a dremel tool which allowed me to position a jewelers saw and cut around the intricate shape. A dremel is a type of engraving tool which comes with a variety of attachments. I used a small cutting disk to make a couple of incisions. This allowed me to insert the jeweler's saw, which is designed for intricate cutting work.Carefully take the blade apart and insert it through the incision, then refit it quite tightly. It needs to be tight in order to cut through the plastic.

Cutting Ball

You can see in the picture that I have clamped a piece of board with a sharp triangle cutout onto a table. This allows you to position the half ball onto a steady surface. Moving the blade up and down, hold the ball carefully and turn it as you cut.

You can cut whatever shape you like as the jewelers saw will allow you to go around intricate curves. I used a traditional bell opening shape which looks a bit like a dog bone. When the cuts were finished I evened them off with some sand paper, while being careful of the finish of the smooth plastic. You don’t want to sand the plastic or it will show up in your paint job. At this time you can cut off the balls hanging tab which you can see in the left of the next photo as we won't need that.

Ready to Paint

I used folk art paint for its superior gold colour. This gold actually looks shiny as it has some kind of metallic powder which catches the light. The cheaper gold paints look brown and dull. To achieve a nice finish I had to do 3 or 4 coats. When the painting was done I used a small hand drill to put two very small holes in the side opposite the cut. You can find hand drills in hobby stores as plastic model makers (ie Warhammer) often use this tool. Using some wire, I suspended a real bell on the inside and formed a loop on the outside so I had something to thread the ribbon through. Then the two halves were glues together.
Painting

The hat was made out of polar fleece. I used a very basic shape for the ears and a 6 panel hat pattern. The eyes are simple ovals with a wide zigzag stitch like is used for appliqué to form the pupils. After sewing together the hat with the ears in the top seam, I pinned the eyes and carefully hand sewed around them. Just before stitching them closed I put a little stuffing inside to make them raised from the hat.

Dejiko Hat

I used blue ribbon to tie on the bells using a wide needle to thread it through the polar fleece of the hat just below the ears. The bells are held on only by the ribbons and the whole lot sits atop my wig without any pins or support. After several wears I have only had the hat fall off once.

Tuesday, April 8, 2008

Brisbane Supanova 2008

Fate/Stay Night Group

I have recently returned from Brisbane Supanova and now that I have caught up on some sleep I wanted to express how much everyone impressed me with their costuming this year. It was so fantastic to meet so many new people and talk (however briefly) about your costumes and experience and I hope some of you will find me and say hello!

As far as my costuming is concerned, you could have seen me running around in a commissioned Japanese school uniform on Saturday (and I got a lot of comments about being Sailor Moon for some reason), or as Dejiko on Sunday for which I still have several articles to write, especially after having a lot of questions about my bells and shoes. I am hoping to get those other articles up as soon as I can.

As one of the judges for Madman’s cosplay competition on both days it was unfortunate that there can only be a certain number of winners. The panel of judges had to deliberate quite a lot on some of the decisions that were made due to the high level of both costuming and performance; however in my mind everyone who got on stage deserved something for their time and effort.

For this entry I thought I would give you an insight into what a judge is looking for and how you can provide them with the best way to evaluate your costume and performance.

1. If you are performing a skit then please utilise the stage – centre front is good! Make sure you give everyone the best opportunity of seeing you.

2. If the judges are to the side of the stage (as we were during the more informal Saturday competition), then please make sure you walk past them. Don’t go too fast as we want to see your costume. If you are encouraged, stop and answer any questions and point out any parts of your costume you think the judges should notice.

3. Be honest if you did not make the costume yourself!! We like honesty and it doesn't necessarily mean you will be precluded from a prize.

4. If you are not performing a skit please make sure you stop and pose for a reasonable length of time. Practice poses that show off your costume, for example, if you have spent a lot of time on a prop or the back of your costume is noteworthy (wings, etc), then you might want to pose with that prominent. Choose up to three poses and stop long enough for photos.

5. Time and practice your skit. Usually there is a two minute limit for cosplay and skits which you should try to stick to. A shorter skit means that the judges won’t get bored, and boring the judges is not a good way to stick in their memories! You can say a lot in 2 minutes.

6. Keep it PG13. And to those Yaoi fans out there... I personally don't find Yaoi to be an entertaining skit!!! Please do something original.

After the competition is over, audience members may want to tell their favourite cosplayer how much they liked their costume or enjoyed their performance. As a costumer myself who has been in these competitions the positive comments are great to hear, but one thing I don’t like hearing is if I should have won over someone else or that you didn’t like the costume that won and thought your favourite should instead. The panel judges are chosen for their expertise in differing areas and have their reasons for choosing one entry over another.

You also don’t know who is listening or who you might offend with a careless comment about another person’s costume. The person you are talking to may be offended if you say you thought the costume which won was bad as it might happen to be their friend. There are ways of telling another person about your enjoyment of their costume without putting down others, and if you remain encouraging then we can hope to see the cosplay at these events reach new heights every year!!

A very big well done from me to every person who put on a costume for this year's Brisbane Supanova and a big thankyou to the organisers for putting on a fantastic weekend!!

Monday, August 13, 2007

Rin's Kaleido Stick Wand

This is Rin's Kaleido Stick which turns her into a cat girl in the game Fate/ Hollow Ataraxia. There was no option of buying this prop and I did not want to wear the costume without it as it is the costume she has because of this piece.

Difficulty: Hard
Time: 20 hours


By breaking your object into its basic shapes you can get an idea of the kind of things you will need to make it. I started with a piece of dowel, some PVC pipe and cardboard.

I cut the PVC pipe so it was the same thickness as the dowel with a hacksaw and drilled 5 holes with a hand-held hobby drill at equal distances. To gauge the distances I marked a circle on a piece of paper with a compass and then used the compass to mark 5 equal lines on the circle, which can then be joined to form a star as a guide. I fed through thin copper wire to form a base for my star so that it would be solidly suspended in the PVC pipe.

The PVC pipe section was stuck to the dowel with liquid nails and allowed to set over night. Then I started building up the outside of the PVC pipe with paper clay (DAS). Over all this method is a little heavy, but is very easy to mould, air dries hard and is able to be sanded and painted, which was a benefit of this material over other options.

Once I was reasonably happy with the outside of the PVC pipe I cut out 4 stars from cardboard and glued them either side of the copper wire so that they built up the centre star. You can’t tell there is wire in the centre, but this gives strength to the star as only the points are touching the PVC pipe base. I used Tarzan's Grip glue as I have never had a problem with it not sticking to just about any surface. I actually stuck the cardboard either side together, so the copper wire suspends the star, but it is actually that the cardboard is glued together which holds it in place.


The wings were constructed with a cardboard base and built up with DAS. I found that because the paper clay starts off wet the cardboard warped a little, but that added to the effect I was going for. This was sanded and then painted separately to the main wand. This did leave the wings very delicate and after a couple of wears of this costume (and traveling interstate with it twice) I discovered hairline fractures around the base of the wings. Airline security also loves to touch this sort of thing regardless of how much bubble wrap you have it in and how much you tell them to please be very careful as it is a cardboard sculpt that is quite fragile. Hence the corners of the wings are now a little dog-eared. Thanks airline security!


The best gold paint I found was for folk art, and though it is a little on the expensive side it paints very nicely and has a more realistic gold colour. It took at least 3 coats to build up a decent covering. When all the pieces were painted the wings were glued to the outside of the star and the cross for the bottom was glued into its slot. (The cross is actually 3 layers of cardboard with a tab that slides into a slot in the handle to give it strength - the part has broken off in travel, but glued back in with no noticeable damage)

Lastly the whole lot was coated in several layers of clear coat and the 8 gems were glued into position on the wings.

Thursday, July 26, 2007

Dejiko Shoes and Gloves

Dejiko Shoes are a relatively easy shoe cover because you have a little wriggle room for making mistakes since it doesn't need to be a tight cover and you will be using stuffing to create the shape you need.

Difficulty: Medium
Total Time: approx 8 hours

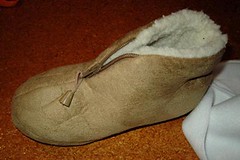
First find a cheap, comfortable pair of slippers to use as your base. Mine cost less than $10 and there didn't seem to be a left and a right foot so they were perfect for this application.


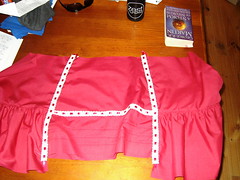
The boot cover itself is a bit like a horseshoe shape with the open end of the horse shoe sewn so the seam is at the back of the heal on the boot. Depending on what kind of slipper you have bought will potentially change the shape of your shoe cover.

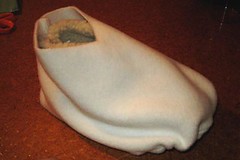
Get some scrap material and start by making a horseshoe shape that can cover the boot. Don't worry about the toe at this stage (you need a little excess there), but when you sew a seam up the back make sure you can get it over the boot and so that the top is around your ankle height. Have a close look at the pictures. Then cut your pattern out of your polar fleece.

Use a long stitch along the front of the boot cover and gather in the toe, then stitch up the back and line up your shoe cover. Use pins to hold it in place and gather more or less until the bottom of the boot cover fits snuggly over your slipper. Using a curved needle stitch your boot cover close to the sole of the slipper.


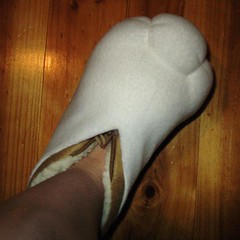
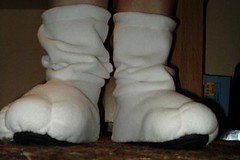
Next lightly stuff the front of the boot cover on top of the slipper until you have the desired "fluffiness" and, using a long matress needle, take a length of cotton in through the material and stuffing close to the sole and up out of the top of the foot being careful not to pierce the slipper. Pull the cotton tight, tie and hide the ends. This will form the toes.


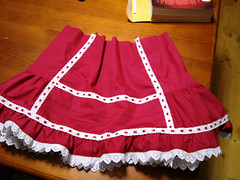
Next make a "leg warmer" out of a tube of material. Hem the top and insert some elastic to hold them up. The bottom should be the same size as the opening you have for your shoe cover. Line up the bottom of the boot cover with the top of the shoe cover and carefully stitch around them. Because there is some looseness around your leg it doesn't matter if it isn't perfect and you won't see this seam.

Finally add your ribbon trim and you're done!


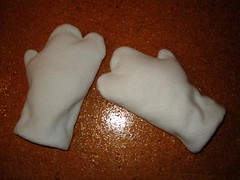
The gloves are made in very much the same way.

I used a cheap pair of acrylic wool gloves that I bought for approx $2 and used the left over polar fleece. The pattern for the top is larger than the bottom pattern and I have created a hint of two fingers and a thumb so they are reasonably functional for carrying things, but not for doing anything more specific such as using a mobile phone or retrieving money from a wallet.

First sew the top and bottom together and leave inside out. Place the real 5-finger glove onto the inside out dejiko glove and stitch the fingers into place around the tips and down either side of the hand. Now turn your glove in the right way so that the real glove is inside and lightly stuff the top, leaving the palm unstuffed. Now turn the polar fleece in at the wrists and stitch to keep the stuffing in place.