

DiGi Charat Group
Everyone’s favourite part of my Dejiko is my bells and it’s my favourite part too. The bells really do jingle!
To make them you need a couple of special tools, however they are fairly easy with a little patience.
The bells started life as a clear plastic decoupage ball – the kind you can get from many craft stores. They come in varying sizes, so you might want to take a small mirror and check their sizing against your head. I had many a strange look at my local craft store, which was very interested when they asked me what I wanted them for. Decoupage balls are designed to be taken apart, decorated and put back together, and they are quite strong and thick plastic.
I made my first cuts with a dremel tool which allowed me to position a jewelers saw and cut around the intricate shape. A dremel is a type of engraving tool which comes with a variety of attachments. I used a small cutting disk to make a couple of incisions. This allowed me to insert the jeweler's saw, which is designed for intricate cutting work.Carefully take the blade apart and insert it through the incision, then refit it quite tightly. It needs to be tight in order to cut through the plastic.
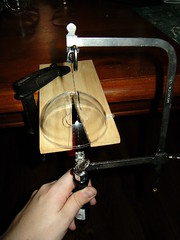
Cutting Ball
You can see in the picture that I have clamped a piece of board with a sharp triangle cutout onto a table. This allows you to position the half ball onto a steady surface. Moving the blade up and down, hold the ball carefully and turn it as you cut.
You can cut whatever shape you like as the jewelers saw will allow you to go around intricate curves. I used a traditional bell opening shape which looks a bit like a dog bone. When the cuts were finished I evened them off with some sand paper, while being careful of the finish of the smooth plastic. You don’t want to sand the plastic or it will show up in your paint job. At this time you can cut off the balls hanging tab which you can see in the left of the next photo as we won't need that.
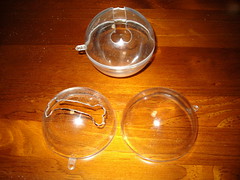
Ready to Paint
I used folk art paint for its superior gold colour. This gold actually looks shiny as it has some kind of metallic powder which catches the light. The cheaper gold paints look brown and dull. To achieve a nice finish I had to do 3 or 4 coats. When the painting was done I used a small hand drill to put two very small holes in the side opposite the cut. You can find hand drills in hobby stores as plastic model makers (ie Warhammer) often use this tool. Using some wire, I suspended a real bell on the inside and formed a loop on the outside so I had something to thread the ribbon through. Then the two halves were glues together.

Painting
The hat was made out of polar fleece. I used a very basic shape for the ears and a 6 panel hat pattern. The eyes are simple ovals with a wide zigzag stitch like is used for appliqué to form the pupils. After sewing together the hat with the ears in the top seam, I pinned the eyes and carefully hand sewed around them. Just before stitching them closed I put a little stuffing inside to make them raised from the hat.

Dejiko Hat
I used blue ribbon to tie on the bells using a wide needle to thread it through the polar fleece of the hat just below the ears. The bells are held on only by the ribbons and the whole lot sits atop my wig without any pins or support. After several wears I have only had the hat fall off once.
did u make these costumes?
ReplyDelete