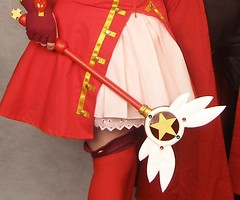
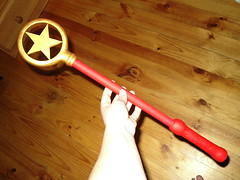
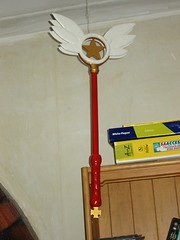
This is Rin's Kaleido Stick which turns her into a cat girl in the game Fate/ Hollow Ataraxia. There was no option of buying this prop and I did not want to wear the costume without it as it is the costume she has because of this piece.
Difficulty: Hard
Time: 20 hours
By breaking your object into its basic shapes you can get an idea of the kind of things you will need to make it. I started with a piece of dowel, some PVC pipe and cardboard.
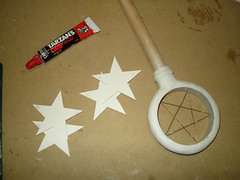
I cut the PVC pipe so it was the same thickness as the dowel with a hacksaw and drilled 5 holes with a hand-held hobby drill at equal distances. To gauge the distances I marked a circle on a piece of paper with a compass and then used the compass to mark 5 equal lines on the circle, which can then be joined to form a star as a guide. I fed through thin copper wire to form a base for my star so that it would be solidly suspended in the PVC pipe.
The PVC pipe section was stuck to the dowel with liquid nails and allowed to set over night. Then I started building up the outside of the PVC pipe with paper clay (DAS). Over all this method is a little heavy, but is very easy to mould, air dries hard and is able to be sanded and painted, which was a benefit of this material over other options.
Once I was reasonably happy with the outside of the PVC pipe I cut out 4 stars from cardboard and glued them either side of the copper wire so that they built up the centre star. You can’t tell there is wire in the centre, but this gives strength to the star as only the points are touching the PVC pipe base. I used Tarzan's Grip glue as I have never had a problem with it not sticking to just about any surface. I actually stuck the cardboard either side together, so the copper wire suspends the star, but it is actually that the cardboard is glued together which holds it in place.
The wings were constructed with a cardboard base and built up with DAS. I found that because the paper clay starts off wet the cardboard warped a little, but that added to the effect I was going for. This was sanded and then painted separately to the main wand. This did leave the wings very delicate and after a couple of wears of this costume (and traveling interstate with it twice) I discovered hairline fractures around the base of the wings. Airline security also loves to touch this sort of thing regardless of how much bubble wrap you have it in and how much you tell them to please be very careful as it is a cardboard sculpt that is quite fragile. Hence the corners of the wings are now a little dog-eared. Thanks airline security!
The best gold paint I found was for folk art, and though it is a little on the expensive side it paints very nicely and has a more realistic gold colour. It took at least 3 coats to build up a decent covering. When all the pieces were painted the wings were glued to the outside of the star and the cross for the bottom was glued into its slot. (The cross is actually 3 layers of cardboard with a tab that slides into a slot in the handle to give it strength - the part has broken off in travel, but glued back in with no noticeable damage)
Lastly the whole lot was coated in several layers of clear coat and the 8 gems were glued into position on the wings.
Monday, August 13, 2007
Thursday, July 26, 2007
Dejiko Shoes and Gloves
Dejiko Shoes are a relatively easy shoe cover because you have a little wriggle room for making mistakes since it doesn't need to be a tight cover and you will be using stuffing to create the shape you need.
Difficulty: Medium
Total Time: approx 8 hours
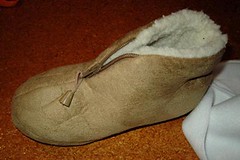
First find a cheap, comfortable pair of slippers to use as your base. Mine cost less than $10 and there didn't seem to be a left and a right foot so they were perfect for this application.
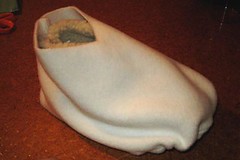
The boot cover itself is a bit like a horseshoe shape with the open end of the horse shoe sewn so the seam is at the back of the heal on the boot. Depending on what kind of slipper you have bought will potentially change the shape of your shoe cover.
Get some scrap material and start by making a horseshoe shape that can cover the boot. Don't worry about the toe at this stage (you need a little excess there), but when you sew a seam up the back make sure you can get it over the boot and so that the top is around your ankle height. Have a close look at the pictures. Then cut your pattern out of your polar fleece.
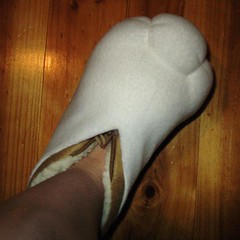
Use a long stitch along the front of the boot cover and gather in the toe, then stitch up the back and line up your shoe cover. Use pins to hold it in place and gather more or less until the bottom of the boot cover fits snuggly over your slipper. Using a curved needle stitch your boot cover close to the sole of the slipper.
Next lightly stuff the front of the boot cover on top of the slipper until you have the desired "fluffiness" and, using a long matress needle, take a length of cotton in through the material and stuffing close to the sole and up out of the top of the foot being careful not to pierce the slipper. Pull the cotton tight, tie and hide the ends. This will form the toes.
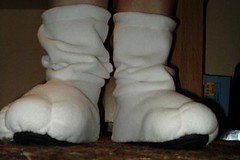
Next make a "leg warmer" out of a tube of material. Hem the top and insert some elastic to hold them up. The bottom should be the same size as the opening you have for your shoe cover. Line up the bottom of the boot cover with the top of the shoe cover and carefully stitch around them. Because there is some looseness around your leg it doesn't matter if it isn't perfect and you won't see this seam.
Finally add your ribbon trim and you're done!
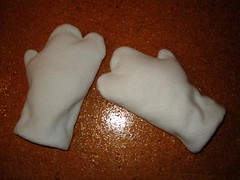
The gloves are made in very much the same way.
I used a cheap pair of acrylic wool gloves that I bought for approx $2 and used the left over polar fleece. The pattern for the top is larger than the bottom pattern and I have created a hint of two fingers and a thumb so they are reasonably functional for carrying things, but not for doing anything more specific such as using a mobile phone or retrieving money from a wallet.
First sew the top and bottom together and leave inside out. Place the real 5-finger glove onto the inside out dejiko glove and stitch the fingers into place around the tips and down either side of the hand. Now turn your glove in the right way so that the real glove is inside and lightly stuff the top, leaving the palm unstuffed. Now turn the polar fleece in at the wrists and stitch to keep the stuffing in place.
Sunday, February 18, 2007
Cat Ears
An upcoming costume required ears, but I've realized there aren't really any instructions on how to make these, so I had to make it up as I go along. Perhaps this will help someone.
Difficulty: Easy
Total Time: approx 3 hours
I bought a black headband that had a material covering to sew my ears to, but you could just as easily attach clips or hair pins and attach your ears straight to your hair.
First I made a pattern from paper by cutting and trimming until I reached a shape that I liked. At the centre of the head my ears fold over to try to make them look more natural.
Next I cut 2 pieces of polar fleece for each side and sewed the top edges together, leaving the bottom edge unsewn. These were turned inside out, then I hand stitched a small piece of black toy fur to the inside of the ear so it looks like longer fur coming from the inside (many anime ears show this, but real ears look a bit different).
I used pins to mark the centre of the headband and then hold the ears in place while I stitched them down. I found that they looked better with about two inches left between them at the top of the headband. Its easiest to stitch on the ears with a curved needle - in fact I think it would be almost impossible without one. Curved needles are really good for sewing something to a flat surface, especially if the surface is solid because the curve helps you to push the needle through and come up and out the other side.
Carefully stitch all the way around the ear. When you do the second one take extra care to keep the positions symetrical. And with a bit of patience, you will have some lovely fluffy ears.
Thursday, January 25, 2007
Jorvik Cap
I've always wanted one of these for sun protection, so it was about time I made one. I deviated from the accepted pattern to make it more comfortable, and completely hand-sewed it so that accounts for the time.
Difficulty: Easy
Total Time: approx 6 hours
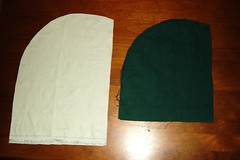
The accepted pattern for the Jorvik cap is generally a rectangle which has a seam sewed to fit to the curve of the head. The caps of this kind found in Jorvik had this part tailored so that the cap was curved (as in the one I have made), however in Dublin the material was not cut, leaving a point created by the seam.
To fit my head better I tailored the curve a little more and ended up sewing this in two pieces. This also allowed me to leave the seam open at the back of the neck so that my hair won't becom too bunched up underneath. Fitting something to the head can be hard, so I had help with checking how the seam was lying on the mockup and alterating the length of the cap.
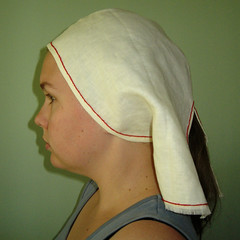
I sewed and hemmed the cap by hand using linen thread, then used wool embroidery wool to do some decorative stem stitch around the outisde. The linen ties were also hand sewed, then attached to the cap.
The generally accepted way of wearing this style of hood is with the strap under the chin and flaps hanging down over the ears, however I find it much more comfortable to tie it like a scarf at the back of my neck (as shown), which should keep my hair out of my face better as well.
Subscribe to:
Comments (Atom)

